SOAPUI
SoapUI is a tool which can be used for both functional and non-functional testing. SoapUI can be used to test complete RESTful API and SOAP Web Service testing. It supports Functional Testing, Performance Testing, Interoperability Testing, Regression Testing, Load Testing, and much more.
SOAPUI tools are used to test webservices but SOAP is an protocol used to sending and receiving messages between web services.
Following are some important features of SoapUI.
1. It is capable of performing the role of both client and service.
2. It enables the users to create functional and non-functional tests quickly and in an efficient manner using a single environment.
3. It is purely implemented using JAVA platform.
4. It supports Windows, Mac, multiple Linux dialects.
5.It allows testers to execute automated functional, regression, compliance, and load tests on different Web API.
6.It supports all the standard protocols and technologies to test all kinds of APIs.
It is user friendly as well as it is easy to convert functional test into non-functional tests such as Load, Stress testing.
SOAPUI Vs Selenium
Let's compare SoapUI with Selenium
SoapUI
|
Selenium
|
| SOAP UI is NOT used for User Interface Testing. It is only used for WebAPI or WebService Testing |
Selenium is used for User Interface Testing. |
| Capable to test the data sent and received between the web browser and a web server. Can test the protocols/technologies such as REST, SOAP. | Selenium cannot test protocols, but they can test the UI behavior. |
| Able to perform functional, load and Security Testing of the above-mentioned technologies. |
Selenium can perform only Functional Testing. Performance Testing to some extent because we can track execution time with regards to the performance but cannot test multi user and multi tenancy. Selenium certainly cannot be used for security testing |
| It is PROTOCOL Dependent and NOT browser dependent. | Selenium depends on the browser capabilities.Selenium depends on the browser capabilities. |
Creating a Project
Step 1: Now depending upon the project, we need to import SOAP/REST protocol. We will create a new SOAP Project.

Step 2: a.We will use following SOAP request
http://www.dneonline.com/calculator.asmx?WSDL
b. Enter the Project Name
c. Enter the path of the WSDL request. In this case
http://www.dneonline.com/calculator.asmx?WSDL
d.Click OK
http://www.dneonline.com/calculator.asmx?WSDL
b. Enter the Project Name
c. Enter the path of the WSDL request. In this case
http://www.dneonline.com/calculator.asmx?WSDL
d.Click OK

Step 3: Upon creating the SOAP project with the above-said WSDL,it will generate all the operations that are present in that webservice. we will be able to see that there are 4 operations that will be imported into the project.Add,Subtract,Multiply and divide.

Here soap1 is the previous version and soap12 is the latest version.We will work with latest one.
Step 4: Expand the first request and double click on the 'Request1'. It will display the SOAP request in the XML format.
Step 4: Expand the first request and double click on the 'Request1'. It will display the SOAP request in the XML format.

Step 5:We need to put the input value into the place of the ‘?’ .

Step 6:Then after hitting the green color run button it will generate the response XML file.

SoapUI – TestSuite/TestCase/TestStep
To have all possible scenarios tested without having to directly edit the operation itself,we need to create testsuites/testcases/TestSteps.
Creation of TestSuite
TestSuite is a collection of Test Cases that can be used for grouping functional tests into logical units. Any number of TestSuites can be created inside a SoapUI project to support massive testing scenarios.
Step 1: Within the project, testers can create a test suite by performing a right click on the root of the project.


Step 3: The created test suite is displayed the navigator pane as shown below.

Step 4: Double-click the TestSuite Name, and the TestSuite window opens at the right panel. Since there no TestCases are added, it is blank.

Creating Test Case
A TestCase is a collection of TestSteps assembled to test some specific aspect of web service(s). The user can add n number of TestCases to a TestSuite and even modularize them to call each other for complex testing scenarios.
Step 1: Within a test suite, we can create multiple tests by performing right click on the 'test suite' and choosing 'New Test Case'.

Step 2: Specify the name of the Test Case and click 'OK'.

Step 3: The created test case has zero steps as shown below.

Note: We can see that the test case is added with zero test steps for all kinds of tests available. Upon adding the test steps the numbers in the bracket would change automatically. The functional test step should go into 'Test Steps' while a performance test step should go into 'Load Test' and a security test step should go into 'security Tests'.
Step 4: Double-click the TestCase Name, and a TestCase window opens on the right hand side panel. Since there are no TestSteps added, it is blank as seen in the following screenshot.
Step 4: Double-click the TestCase Name, and a TestCase window opens on the right hand side panel. Since there are no TestSteps added, it is blank as seen in the following screenshot.

Insertion of TestStep
TestSteps are the "building blocks" of functional tests in SoapUI. These are added to a TestCase and used to control the flow of execution and validate the functionality of the web service(s) to be tested.
Step 1: Add a new step 'SOAP Test Request' as shown below.
TestSteps are the "building blocks" of functional tests in SoapUI. These are added to a TestCase and used to control the flow of execution and validate the functionality of the web service(s) to be tested.
Step 1: Add a new step 'SOAP Test Request' as shown below.

Step 2: Enter the step name and click OK.

Step 3: Upon clicking 'OK', a dialog pops up to select the operation to invoke. All the operations are listed, and user can select the operation that they would like to invoke.

Step 4:Upon Selecting the operation, click 'Ok'.
Step 6: The test step count is now incremented to one as we have just added one test step. Similarly upon adding load and security tests step, the corresponding number would be automatically incremented based on the number of steps added.
Step 6: The test step count is now incremented to one as we have just added one test step. Similarly upon adding load and security tests step, the corresponding number would be automatically incremented based on the number of steps added.

SoapUI - Request & Response
Step 1: We need to enter these inputs in place of the question mark which will be sent as request XML.After inputting those values into the corresponding XML tags, click 'submit request' button to check the response.

Step 2: Upon submitting a request the web service request is processed by the webserver and sends back a response as shown below.

SOAPUI-Assertion
Assertion means act of affirming or stating something. It can also be interpreted as check point or a validation point.Once a request is sent to a web server a response is received. We need to validate if the response contains the data that we expect. In order to validate the response, we need to use assertions.
Types Of Assertion
There are various ways of asserting a response; however we will focus on the commonly used Assertions types while validating a response.
CONTAINS ASSERTION
Searches for the existence of the specified string. It also supports regular expression.
Step 1: By Default there are no assertions.The Number of Assertions are shown in the Assertions Tab.
To add a new assertion, click on 'Add New Assertion' button.

Step 2: Now,Select the Assertion Category.Select the Assertion Type.Click 'Add'.

Step 3: Let us validate if the string '50' exist in the response. Click
'OK'

Step 4: Upon adding it, immediately assertion is executed and shows if
VALID or INVALID.

Step 5: Now Let us say we change the content of 'Contains Assertion' to
'60' and see what happens.

Step 6: The Assertion is executed and the result is thrown to the user.
Since we don't have the string "60" within the response, the
assertion has failed.

NOT CONTAINS ASSERTION
Searches for the Non-existence of the specified string. It also supports regular expression.
Step 1: Now after clicking on 'add new assertions' button,Select the Assertion Category.
Select the Assertion Type – In this case 'NOT Contains'.Click 'Add'.
Searches for the Non-existence of the specified string. It also supports regular expression.
Step 1: Now after clicking on 'add new assertions' button,Select the Assertion Category.
Select the Assertion Type – In this case 'NOT Contains'.Click 'Add'.

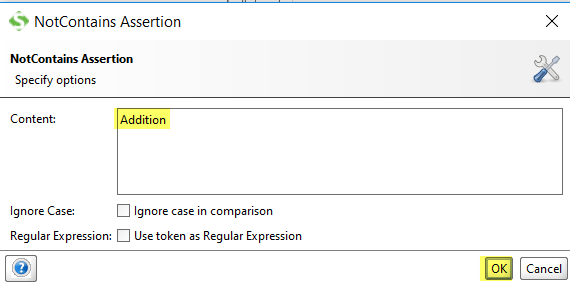
Step 2: Let us validate if the string 'Addition'
exist in the response. Enter the string 'Adition' and Click 'OK'.
Step 3: As soon as an assertion is added, it executes
and displays the result.

Step 4: Now let us change the contents of the 'Not
Contains Assertion' and see what happens.

Step 5: Assertion will failed.

XPATH MATCH ASSERTION
Uses XPath expression to select the target node and its values. XPath, is an XML query language for selecting nodes from an XML document.
Step 1: Now after clicking on 'Add New Assertions' button,Select the Assertion Category.
Select the Assertion Type – In this case 'XPath Match'.Click 'Add'.
Uses XPath expression to select the target node and its values. XPath, is an XML query language for selecting nodes from an XML document.
Step 1: Now after clicking on 'Add New Assertions' button,Select the Assertion Category.
Select the Assertion Type – In this case 'XPath Match'.Click 'Add'.

Step 2: Add XPath Window opens.
Before Adding XPath, we need to declare the NameSpace. An XML namespace is a collection of names, identified by a Uniform Resource Identifier (URI) reference, which are used in XML documents as element and attribute names. The same is used in SOAP UI XPath Assertion.
For declaring XML Namespace, we just need to click on 'Declare' button which would do the job for us else we can also manually declare a namespace ourselves.

After declaring the namespace we need to refer the XPath using the created name space.
Upon clicking the 'Declare' button, two namespaces will pop up as we have two URI's. One of them is the schema URL and the other one corresponds to the actual web service URL. We need to use the actual namespace where the web service is located and NOT the schema namespace while referencing XPath.
declare namespace soap='http://www.w3.org/2003/05/soap-envelope';
declare namespace ns1='http://tempuri.org/';
Step 3: Now we need to enter the XPath of the XML node that we need to validate.
After entering the XML, we need to click on 'Select from current' so that value from the current response would be picked up for comparison going forward.

Step 4: The added Assertion will be displayed as shown
below.

Step 5:The Ssertion will pass.

Xquery match Assertion:
XQuery uses an XQuery expression to select content from the target property. It compares the result of an XQuery expression to an expected value.
Step1: After clicking Add Assertion, select Assertion Category – Property Content.Select Assertion Type – XQuery Match.Click Add.
XQuery uses an XQuery expression to select content from the target property. It compares the result of an XQuery expression to an expected value.
Step1: After clicking Add Assertion, select Assertion Category – Property Content.Select Assertion Type – XQuery Match.Click Add.

Step 2: Similar to XPath, click ‘Declare’ to declare
the namespace automatically or enter it manually.
Following XQuery structure needs to be defined −
<Result>
{
for $x in //ns1: <XPath>
//It declares iteration and XPath is where similar
nodes are present
return <Name>{data($x/ns1:<attribute>}</Name>
//it will return all values of the attribute
}
</Result>

Step 3: Select from current tab will display all the
values present currently in response.

Step 4: The added Assertion will be displayed as shown
below.

SoapUI – Properties
Properties are a central aspect of more advanced testing with SoapUI.Properties can be used to hold authentication credentials, making it easy to manage these in a central place or an external file.
Properties can be used to transfer and share session ids during test execution, so multiple test steps or test cases can share the same sessions.
Defining Properties
Properties can be defined at many levels in a project.
Properties that are common at the project-level can be defined at the Project level.
Similarly, TestSuite and TestCase specific properties can be defined at their respective levels.
Project specific properties are defined in the Custom Properties tab.
Accessing Property
A property can be accessed anywhere in the Project by using Property Expansion.
Structure would be as −
${#Project#PropertyName} – For Project Level
${#TestSuite#PropertyName} – For Test Suite level
${#TestCase#PropertyName} – For Test Case level
${TestStepName#PropertyName} – For Test Step level
The same structure can be placed at Request XML to get the value of specific attribute during run-time
Adding Property in Test Case level
1.Double click on Test case.Double click on custom properties.Click on ‘+’ button.

2.Enter property name and value.

3.In the request XML file we can access the property
by manually writing the property name
${#TestCase#intA} and ${#TestCase#intB}or we can fetch
it as below screenshot.

4.Hit the run button and below output will be shown.

Comments
Post a Comment